Hello Space Walk Country!
This post is a step-by-step guide to setting up your Space Walk email on your laptop or desktop computer. This guide is specifically for Mac Mail, the default mail program for the Macintosh operating system.
If you need the guide for Windows/Outlook, you can find that here.
![]()
Experience the ease of managing email from a computer instead of mobile device. Trust me, it’s worth the brief moments of frustration.
1. Open Mac Mail. If this is the first time that it has been used, the Setup Assistant will appear. Otherwise, select Mail / Preferences / Accounts / +.
2. Enter the following information:
- Full Name—Enter your first and last name. This is the name that will appear in the From field of messages you send.
- Email Address—Enter your entire email address (e.g., myname@mydomain.com).
- Password—Enter the password for your email account.
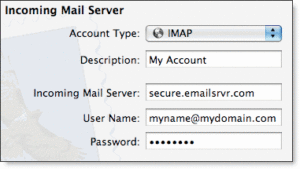
3. Click the Continue button and Enter the following information:
- Account Type—Select IMAP from the drop-down menu.
- Description—Enter a descriptive name for your mail account (e.g., Space Walk).
- Incoming Mail Server—Enter the secure server name: secure.emailsrvr.com
- User Name—Enter your entire email address (e.g. SpaceWalkABC@herecomesfun.com).
- Password—Enter the password for this account.

4. Click the Continue button and Mac Mail will now attempt to detect the incoming server settings. If the Incoming Mail Security window appears, do the following:
- Check the Use Secure Sockets Layer (SSL) box.
- In the Authentication drop-down menu, select Password.
- Click the Continue button.
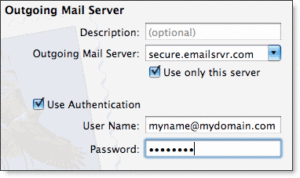
5. Enter the following information:
- Description—This entry is optional. Enter a descriptive name for your mail account (e.g., Work Mail or Home Mail).
- Outgoing Mail Server—Enter the secure server name: secure.emailsrvr.com
- Check the Use only this server box.
- Check the Use Authentication box.
- User Name—Enter your entire email address (e.g. SpaceWalkABC@herecomesfun.com).
- Password—Enter the password for your email account.

6. Click the Continue button and Mac Mail will now attempt to detect the outgoing server settings. If the Outgoing Mail Security window appears, do the following:
- Check the Use Secure Sockets Layer (SSL) box.
- In the Authentication drop-down menu, select Password.
- Click the Continue button.
7. When the setup process is done, you will see an Account Summary window that summarizes your connections. Click the Create button.
