
Hello Space Walk Country!
This post is a step-by-step guide to setting up your Space Walk email on your laptop or desktop computer. This guide is specifically for Microsoft Outlook, the default mail program for the Windows operating system.
If you need the guide for Apple/Mac Mail, you can find that here.

Experience the ease of managing email from a computer instead of mobile device. Trust me, it’s worth the brief moments of frustration.
How to setup your Space Walk email on Outlook:
1. In Outlook, select File, E-mail Accounts, click the Add a new e-mail account radio button and then click the Next button.
2. Select the IMAP radio button, Click the Next button and enter the following information:
- Your Name—Enter your first and last name. This is the name that will appear in the From field of messages you send.
- E-mail Address—Enter your entire email address (e.g. SpaceWalkABC@herecomesfun.com).
- User Name—Enter your entire email address (e.g. SpaceWalkABC@herecomesfun.com).
- Password—Enter the password for your email account.
- If you want Outlook to check for email without prompting you to enter your password, check the Remember password box.
- Incoming mail server (IMAP)—Enter the secure server name: secure.emailsrvr.com
- Outgoing mail server (SMTP)—Enter the secure server name: secure.emailsrvr.com
3. Click the More Settings button then click the Outgoing Server tab.
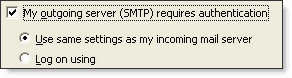
4. Select the My outgoing server (SMTP) requires authentication check box. Leave the default setting, Use same settings as my incoming mail server.
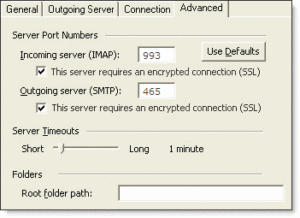
 5. Click the Advanced tab and select the first This server requires a secure connection (SSL) check box.
6. In the Incoming server (IMAP) box, enter the secure incoming port: 993
7. Select the second This server requires a secure connection (SSL) check box.
8. In the Outgoing server (SMTP) box, enter the secure outgoing port: 465.
9. Click the OK button then click the Next button, and lastly click the Finish button.